Tuesday, March 26, 2013

SYMBOLS

Adinkra Paintings

Garden pics

 More views of our garden from last year.  
Giving Thanks!!!!!!!!!!!!!!

Rooftop Garden

A view of our garden spring 2011 :-) Spring will soon come:-)

Monday, March 25, 2013

Passover Seder Meal (Vegan)

Today is the first day of Passover so we read the Torah portion Exodus 12:21-51, marked the doorway, then had the Seder meal in remembrance of our ancestors exodus from Egypt.

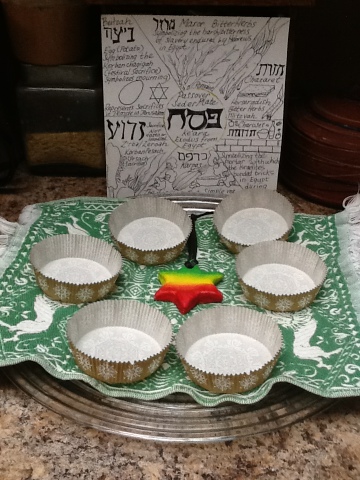
The meal is accompanied with wine, we use liquid chlorophyll to symbolize the wine/blood. The Passover Seder Plate (Ke'era) has six items on it:

*Maror (bitter lettuce) and *Chazaret (horseradish) - the bitter herbs symbolizing the harsh bitterness of slavery endured by Hebrews in Egypt. The chazaret is eaten between two pieces of unleavened bread in respect to the Mitzvah (commandment)
*Charoset- made of apples, nuts, raisins, cinnamon, and honey or vegan sweetener of your choice. The Charoset symbolizes the mortar with which Israelites bonded bricks in Egypt during enslavement. I added chia seeds and fresh squeezed lemon juice to the Charoset. I make a large bowl of Charoset because we love it!
*Karpas is the dipping of a simple vegetable such as parsley, celery, or boiled potato in salted water to mirror the tears and pain that the Israelites endured.
At this time we ask Ma Nishtana? (Why is this night different from other nights?) Exodus 12:42 states "it is a night to be much observed to the Lord for bringing them out of the land of Egypt (Babylon) this is that night of The Lord to be observed by all the children of Israel.
*Zeroah - Korban Pesach - (pesach sacrifice) is usually a lamb shank but vegans can substitute with a beet or sweet potato. You will see beet pictured here.
*Beitzah -Egg, seed or potato symbolizing the Korban chagigah (festival sacrifice) the egg is given to one in mourning, the egg/seed represents the beginning of life, or life source
The Zeroah and Beitzah represent sacrifices made in the Temple in Jerusalem, they are not eaten or handled during the meal.

Tomorrow we will continue with reading Torah portions , the prayer tomorrow is in Leviticus. we will be without leavened bread for the next 7 days, and each day preparing and praying Torah portions.

Passover is a special time, I am thankful for the prayer, discipline, and remembrance.
Shalom


Sunday, March 24, 2013

Ital Jamaican Veggie Patties

Seriously a comfort food! Since this process takes a couple hours I make these when I am not in a hurry:-) I TRIPLE THIS RECIPE and freeze some of the assembled unbaked patties to have for easy dinners later:-) Ital patties are so delicious and can be eaten warm or at room temp!

INGREDIENTS:
Pastry:
1 3/4 cups unbleached flour
1 cup whole wheat pastry flour
2 teaspoons turmeric
1/2 teaspoon fine sea salt
3/4 cup chilled coconut oil
2 teaspoons apple cider vinegar
1/2 cup plus 2 tablespoons ice water

Filling:
1 tablespoon coconut oil
1/2 cup 1/4-inch-diced yellow onion
1/8 teaspoon ground cinnamon
1/4 teaspoon allspice
1/2 teaspoon ground cumin
1/4 teaspoon red pepper flakes
1/8 teaspoon cayenne
Coarse sea salt
2 larges cloves garlic, minced
3/4 cup coconut milk
1/4 cup 1/4-inch-diced carrots
1/4 cup 1/4-inch-diced yellow potatoes
1/2 cup fresh green peas (or frozen)
1/2 cup sweet fresh corn (or frozen)
1/2 cup shredded cabbage
1 tablespoon minced fresh thyme
1 tablespoon freshly squeezed lemon juice
1/2 teaspoon freshly ground white pepper

Instructions:
First make the pastry dough to cool in the fridge while you make the filling.

For the pastry: Combine 1 1/2 cups of the flour with the pastry flour, turmeric, and salt in a large bowl and mix well. Set the remaining 1/4 cup flour aside. Add the coconut oil to the flour mixture and rub with your fingertip until the mixture resembles fine sand(about 10 minutes)

Combine the vinegar and water and mix well. Then, without overworking the dough, add the vinegar mixture by the tablespoon, while stirring, just until the dough comes away from the sides of the bowl and begins to coalesce. Squeeze into a tight ball, flatten, cover in plastic wrap, and refrigerate for at least 1 hour.

Now make your filling: the ingredients are flexible, this is a general recipe that you can adjust as you like. You can skip all the different herbs and spices and add a generous amount of a curry or jerk blend if you prefer.

For the filling: In a medium-size saute pan over medium-low heat, combine the coconut oil, the onion, cinnamon, allspice, cumin, red pepper flakes, cayenne, and 1/2 teaspoon of salt. Saute, stirring occasionally, for 8 to 10 minutes, or until the vegetables are caramelized. Add the garlic and cook for an additional 2 minutes. Stir in the coconut milk, carrots, and potatoes, reduce the heat to low, cover, and cook until the carrots and potatoes are tender, 10 to 12 minutes. Stir in the green peas, corn, cabbage, thyme, and lemon juice, cover, and cook for 3 minutes more. Season with additional salt and the pepper (or to taste) and set aside to allow the flavors to marry.

When you are ready to assemble patties:
Preheat the oven to 350F and remove the dough from the refrigerator.

With the reserved flour, lightly dust a clean surface, roll out the dough until it is about 1/8 inch thick. Cut six 6-inch circles from the dough (you can use a bowl). Spoon 2 heaping tablespoons of the filling onto the center of one side of each circle, leaving about a 1/8-inch border. Fold the other half over to make a half-moon, press to seal, and make ridges around the edge using a fork. (note: if your dough is at all on the dry side you may need to run wet fingers around the edge of the circles to help get a good seal).

If you have tripled the recipe and decided to freeze some patties now is the time to spread the ones you are not baking on a cookie sheet, do not allow them to touch. Freeze for a couple hours, then wrap each in plastic wrap and the bunch in freezer paper to save for later. Keep frozen until you are ready to bake.

When you are ready to bake; Transfer the patties to a parchment-lined baking sheet and bake until golden brown, about 35 minutes. Serve immediately with some hot sauce.

Makes six big patties, or a couple dozen smaller ones.

Sunday, February 10, 2013

Stocking dry storage for survival and living in a healthy home

You should feel good when you walk into your kitchen and especially upon opening your cabinets. this is the place that you nourish your body! If you are eating and living consciously then hopefully you are avoiding packaged foods and are purchasing bulk foods or growing your own. Bulk foods are stored in glass jars for the best quality. I have collected jars over time to get me to this point, I am thankful to have almost all our dry foods stored in glass jars. This dry storage cabinet could sustain us for months in case of food emergency. In fact I keep very few canned goods in the house because we do not prefer canned goods. Many of these seeds, nuts and grains can be soaked and sprouted for optimal nutrition.

On the bottom shelf I have stored the dry foods we eat most often such as; nuts, seeds, and whole grains. Currently on this shelf are sesame seeds, black caraway seeds, chia seeds, pecans, walnuts, dried fruit, oats (steel cut and rolled), linen bags used for food storage, sprouting, and making nut milks, tahini, almond butter, pine nuts, several varieties of beans, almond slivers, lentils, wheat berries, alfalfa seeds, broccoli seeds, and more!

Baking and more dry storage occupy the second shelf. Although we try to avoid baked goods and sweets, there are times that we will make a healthier version of some popular sweet treats. So any of those ingredients are kept on the top shelf where they are out if reach. Currently on this shelf are: Teff flour, almond meal, flax seed, flax meal, peanut butter, organic spectrum vegetable shortening, dehydrated vegan soups (just add hot water), raw cacao powder, cacao butter, dry coconut, and more!

Sunday, January 13, 2013

Dry Brushing Detox

Dry brushing is One of the best routines I have found for smoothing, detoxing, clearing the skin, gently waking up the circulatory system, draining the lymphatic system, and even reducing cellulite. Twice a week before taking an Epsom salt bath is efficient for this technique. Brush the whole body in upwards motion towards the heart. Spend a few minutes doing this, then hop in an Epsom salt bath for at least 20 minutes and you will find yourself feeling refreshed and your skin will be glowing! Do this at least once (twice is best) a week and you will notice a change (as long as you are eating clean and exercising also!!! )